Thursday, April 23, 2015

The Simple Okie Drip System

I've planted 4 tomatoes plants (Pink Brandy Wine, Sunrise Bumble Bee, Amish Paste, and Yellow Pear), in one of my raised garden beds with approximately 15 to 20 seedlings to plant somewhere else in the garden or in pots. 

This planting season, I've decided to install a simple Okie drip system (I decided on the name of the drip system) to help the tomato plants in the raised bed as a test; to see how well they do with this system. 

You heard right, a simple Okie drip system……here’s how it’s done. You’ll need plastic bottles like water bottles or soda bottles (recycled ones).  A sharp knife, drill, drill bit (small size), and something sharp to cut and drill on…..I used a kitchen cutting board. 

The first thing you want to do is cut the bottom off of each bottle like this.


Next you want to take each lid and drill holes in them.  These holes will allow the water to flow through to the roots of each plant.  If you drill a couple of holes (2 to 4), the water will drip slowly and if you drill 6 to 8 holes in each lid, the water will drip faster to the roots of each plant. 


Secure the lids on each bottle.


Dig a hole next to your tomato plant and place the bottle lid first in the hole.  Make sure your soil is around the bottle like this.


Fill the bottle with water daily, the roots of the plant will take the water when needed. 

This process will be used as a test only in the one raised bed with the tomatoes to see how it works.  The rest of my garden will be watered with the rain barrel and sprinkler system.


Speaking of rain, are you getting some in your location?  Or are you getting snow still?  I know one person who’s getting snow, Mama Pea. She resides up North, where it gets pretty cold, and snows in May.  Check out her blog.  She loves to garden, enjoys quilting, and has a great sense of humor.  When you drop by her blog, tell her I sent you, and let her know I said it’s snowing here in OklahomaJ.
SHARE:

Sunday, April 19, 2015

We Haven't Forgotten


Video Source: You Tube, John Stamools
SHARE:

Tuesday, April 14, 2015

Spreader, Garden, & Burn Update

Back in September of last year, Bulldog Man and I we went to an estate sale and several yard sales, and came back with quite a few great finds.  One of our favorite finds is a fertilizer spreader……the type you attach to your lawn tractor.  It was originally priced for $5.00; we picked it up for $4.00; can’t beat that price…..especially if it works……and it does.  Bulldog Man and I are very happy with our purchase. 

*****
Garden Updates
The Yukon Gold potatoes are growing nicely, they keep popping through the straw which I've laid on top of each plant to protect from the extreme sun.  It’s time once again to lay some straw over the top of each plant.


I planted spinach between each row of lettuce; it’s started popping out of the ground.  Excuse the picture, it’s a bit blurry.

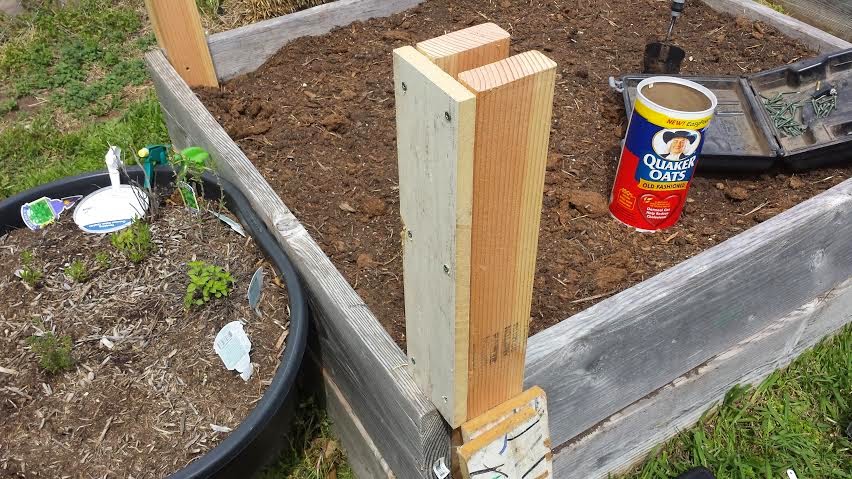
Bulldog Man and I have prepared a garden box for several of my tomato plants.  The soil, compost, and peat are mixed and ready for seedlings.  This year, I decided I wanted wind breaks attached to this garden box to protect my tomato plants from the wonderful winds of Oklahoma. Bulldog Man, with some help for me, made two wind breaks from recycled wood.  The breaks were made for the north and south sides of the garden box, each break is removable.  I can remove one or both breaks to work on my tomato plants or just leave the breaks in place.   You can say I’m a happy girl……now I can gradually bring my tomato plants out of the greenhouse, get them used to the temperature outside, and then plant them in this garden box with wind protection. 


The plywood is removable, now I just need to plant my tomato plants.


*****
Update on Bulldog Man’s Leg
It’s looking so much better, and Bulldog Man is a happy man!
 
BEFORE: Right after the tea water hit the skin.

AFTER: 10 Days After, Looking Better.


*****
Has spring finally hit your area?


SHARE:

Saturday, April 11, 2015

Green Beans & Burns (If faint of heart don't look at the 6th picture)

First I would like to start out by saying hello and welcome to those new followers to my blog.  

*****

We recently added a new garden box for green beans (Cantare, and Blue Lake Bush) in the garden.  Before laying down all the soil, Bulldog Man and I laid out about an inch of fresh soil, put the feedlot trellis back in the box, secured this trellis with a couple of cheap tent stakes, then finished adding soil, and topped the soil with peat moss. 
Staking down the trellis.

Trellis attached to the ground, added soil, and peat.

Planting seeds.


Green beans are a vegetable our family really enjoys as a side dish to a meal or as a complete meal.  We will have plenty of beans to put away in the pantry; a very nice stash for winter. 

*****

While the sprinkler was going in the garden, a little American Robin decided to take a shower.  Every time the sprinkler would rotate around some of my potatoes in tires, the bird would run toward the water.  This picture isn’t the greatest because I didn’t have my real camera with me; just a cell phone.   
You can see the Robin in the right corner of picture.
*****
A couple of nights ago, I made some chamomile orange tea for Bulldog Man.  I placed the hot tea cup on the wood arm (as we always do) of his recliner chair. 

Bulldog Man reached over and adjusted the hot cup; without realizing it, the cup was not sitting on the coaster properly. It was balancing on the edge for a second, and then it was off onto his leg, as he was sitting in the recliner chair.  Needless to say, the hot cup ended up falling onto his leg…..in and around his left knee.  Before he could get up out of his chair, and remove his pajama pants, the hot tea had already burnt his leg.  He now has 1st and 2nd degree burns on his leg.

I immediately had Bulldog Man rinse his leg in the bathtub with cool water.  To help stop the burning sensation and reduce the inflammation, I immediately placed Manuka Honey, an antibacterial medical grade honey, on my husband’s burns and wrapped the burns with sterilized gauze.  We again repeated this process the next day.


After 48 hours of Manuka Honey on the burn, it was time to thoroughly wash the burn with a gentle soap (we used a goats milk soap), cut off the dead skin from the second degree burns once the blisters popped open (only cut with sterile surgical scissors and only when the skin of the blister breaks open on its own….never break the blisters yourself), and then we placed antibiotics on his burns, and again bandaged it up with sterile gauze.

While Bulldog Man is home from work over the weekend, we removed the gauze to expose the burn to the air.  When he returns to work, I will place another bandage on his burn to prevent his pants from rubbing on the burn and irritating it further. 
  
Bulldog Man’s leg looks a lot better since using the Manuka Honey.  I keep a bottle of this medicinal honey in my large first aid bag for emergencies.  
Manuka honey is derived from nectar collected by honey bees from the Manuka bush, known as Leptospermum scoparium from New Zealand, and can be found in your local health food stores. 

Recently, CVS stocks sterile Adhesive Pads with Manuka Honey.  They’re great for abrasions and burns. 

I’m not a physician; please consult with your physician before using any product you’re not familiar with.


SHARE:

Sunday, April 5, 2015

Wednesday, April 1, 2015

Garden Time, & Soup's On


We are gradually increasing the size of our garden.  Evidence of the expansion started with moving the fence out an additional 10 feet in one direction, and 37 feet in another (shown in my previous post).   

At the northern end of the expansion, I placed several tires off the side; specifically for planting Yukon Gold (small) potatoes.  Instead of digging into the ground, I just laid out brown paper, lined up my tires, placed soil, mixed with compost and peat, inside the tire rim, then took my potato slips and placed them randomly throughout the piled soil in each tire, covered each slip with soil, and then threw some straw on the top to help shade the soil.


This morning, while checking the garden to make sure everything was okay from last night’s thunderstorm, I noticed several potato vines already popping out from under the straw.  It was time to layer a little more straw to protect the vines from too much heat.  


Bulldog Man built me another 4X8 foot above ground garden box, and setup two feedlot panels for a quick and easy trellis.  I believe I’ll be planting one of several different types of green beans in this box.  


Instead of taking our old fence to the dump, we decided to recycle it by creating cylinder type planters lined with bamboo.  By my next post, we should have those cylinders made and in place to take a picture. 


Fencing is sharp after cutting it, Bulldog Man was nicked.

Here’s an updated picture on my onions planted in one of the larger garden boxes.  Also at the end of this box are several asparagus growing.


The lettuce is also taking off; I’m contemplating adding spinach in between my lettuce rows.


*****
My Phal schilleriana orchid, also known as the “Pink Butterfly” has flowers blooming on it.  This is my first orchid; I’ve had it for several years, and haven’t yet killed it.  


*****
The last time I roasted off a ham, and made my own lunch meat, I kept the end pieces, and threw them in the freezer to use in a soup or maybe even potatoes a gratin.    Today, I pulled those ends out of the freezer and homemade Navy Bean soup in my crock pot.  Here’s the recipe if you’re interested:

Navy Bean Soup (Made in Crock Pot)
Ingredients
2 tablespoons olive oil
2 garlic cloves
½ onion chopped
4 celery stalks chopped
2 large carrots chopped
1 pound bag navy beans
¾ cup of diced ham
6 cups of water
1 teaspoon rosemary
½ teaspoon paprika
½ teaspoon dried thyme
1 bay leaf
Salt to Taste
Pepper to Taste
 Directions
Pour olive oil in crock pot. Throw in garlic cloves whole, chopped onions, celery, carrots, ham, rosemary, paprika, thyme, rosemary bay leaf, and navy beans (after cleaning your beans and removing sticks, and rocks). Add 6 cups of water, salt, and pepper to taste.

Cook for 4 hours on high. Remove the bay leaf. Then take a spoon or potato masher and mash ½ cup to 1 cup of soup depending on how thick you want your broth.  Then serve up!!!
SHARE:
BLOGGER TEMPLATE CREATED BY pipdig